由于 yolo 已经写好了训练测试等方法,所以我们主要的事情就是如何处理数据集
用到的库
1
2
3
4
5
6
7
8
9
10
import osimport yaml from shutil import copyfile import xml.dom.minidom as minidom import numpyfrom sklearn.model_selection import train_test_splitfrom tqdm import tqdm
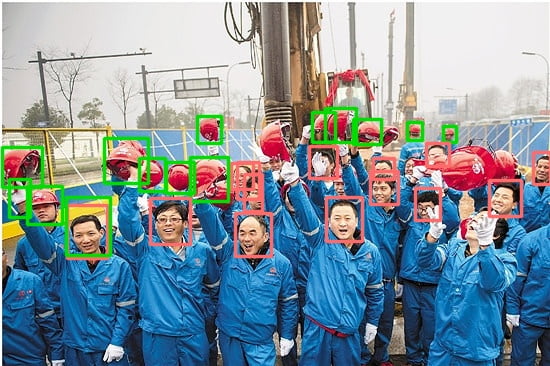
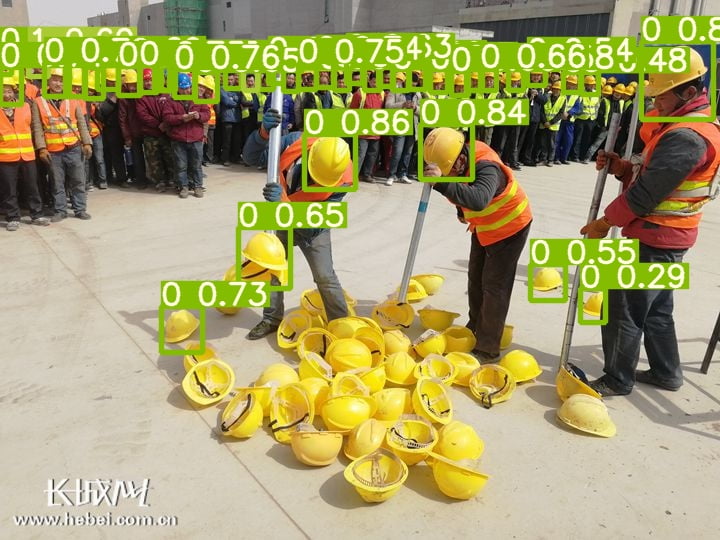
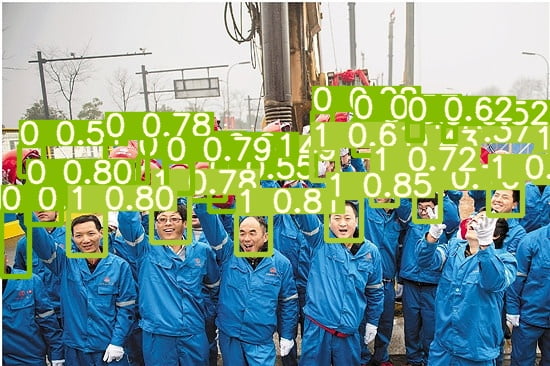
数据集中的类别
1 classes = ['helmet' ,'head' ,'person' ]
我也不知道里面为什么会有几个person的标签。
将存储为左上角左边(xmin,ymin),右下角左边(xmax,ymax)格式的包围框转为,中心点(x,y)与高宽(w,h),并进行基于图片大小的归一化。
1 2 3 4 5 6 7 8 9 10 11 12 13 14 15 16 17 18 19 20 21 22 23 def box_to_anchor (img_size: tuple , bndbox: tuple ) -> tuple : xmin = int (bndbox[0 ]) ymin = int (bndbox[1 ]) xmax = int (bndbox[2 ]) ymax = int (bndbox[3 ]) w = xmax - xmin h = ymax - ymin x = xmin + (w/2 ) y = ymin + (h/2 ) dw = 1. / int (img_size[0 ]) dh = 1. / int (img_size[1 ]) x = x * dw w = w * dw y = y * dh h = h * dh return (x, y, w, h)
1 2 3 4 5 def getElementValueByTag (self, name: str ) -> str : return self.getElementsByTagName(name)[0 ].childNodes[0 ].data setattr (minidom.Element, "getElementValueByTag" , getElementValueByTag)
读取 xml 文件取得:
图像尺寸 - (width,height,depth)
所有包围框 - list
每个包围框的类别 - list
1 2 3 4 5 6 7 8 9 10 11 12 13 14 15 16 17 18 19 20 21 22 23 24 25 26 27 28 29 30 31 32 33 34 def read_xml (path: str ) -> tuple : annotation: minidom.Element = minidom.parse(path).documentElement img_size_xml = annotation.getElementsByTagName("size" )[0 ] img_size = ( img_size_xml.getElementValueByTag("width" ), img_size_xml.getElementValueByTag("height" ), img_size_xml.getElementValueByTag("depth" ) ) objects_xml = annotation.getElementsByTagName("object" ) bndboxs = [] names = [] for object_xml in objects_xml: name: str = object_xml.getElementValueByTag("name" ) names.append(name) bndbox_xml = object_xml.getElementsByTagName("bndbox" )[0 ] bndbox: tuple = ( bndbox_xml.getElementValueByTag("xmin" ), bndbox_xml.getElementValueByTag("ymin" ), bndbox_xml.getElementValueByTag("xmax" ), bndbox_xml.getElementValueByTag("ymax" ), ) bndboxs.append(bndbox) return img_size, bndboxs, names
yolo 需要的标签文件格式为类别id,包围框各值
1
2
0 0.69 0.25885558583106266 0.2672727272727273 0.49046321525885556 0 0.20272727272727273 0.5108991825613078 0.4018181818181818 0.7438692098092643
注意锚框各值应当在0到1之间,否则是边缘框转锚框那一步出错了。
1 2 3 4 5 6 7 def cast_annotation_to_yolo_style_label (src: str , dst: str ): img_size, bndboxs, names = read_xml(src) anchorboxs = [box_to_anchor(img_size,bndbox) for bndbox in bndboxs] 把每个包围框转换为锚框 with open (dst ,'a+' ) as file: for anchorbox, name in zip (anchorboxs,names): print (classes.index(name),*anchorbox,file=file)
我将原始数据保存在E:/DataSet/SafetyHat - root_dirD:/Workspace/Develop/AI/SafetyHatDetection/Dataset - yolo_dataset_dir
分割训练-测试-验证集,并逐个转换并保存
1
2
3
4
5
6
7
8
9
10
11
12
13
14
15
16
17
18
19
20
21
22
23
24
25
26
27
28
29
30
31
32
33
34
35
36
root_dir = r"E:/DataSet/SafetyHat" images_dir = f"{root_dir} /images" annotations_dir = f"{root_dir} /annotations" yolo_dataset_dir = r"D:/Workspace/Develop/AI/SafetyHatDetection/Dataset" yolo_images_dir = f"{yolo_dataset_dir} /images" yolo_labels_dir = f"{yolo_dataset_dir} /labels" files = [path.split("." )[0 ] for path in os.listdir(annotations_dir)] train_files, remaining_files = train_test_split(files, test_size=0.2 , random_state=114514 ) test_files, val_files = train_test_split(remaining_files, test_size=0.5 , random_state=114514 ) print ("训练数据数量:" ,len (train_files))print ("测试数据数量:" ,len (test_files))print ("验证数据数量:" ,len (val_files))print ()print ("处理训练数据..." )for file in tqdm(train_files): cast_annotation_to_yolo_style_label(f"{annotations_dir} /{file} .xml" ,f"{yolo_labels_dir} /train/{file} .txt" ) copyfile(f"{images_dir} /{file} .png" ,f"{yolo_images_dir} /train/{file} .png" ) print ("处理测试数据..." )for file in tqdm(test_files): cast_annotation_to_yolo_style_label(f"{annotations_dir} /{file} .xml" ,f"{yolo_labels_dir} /test/{file} .txt" ) copyfile(f"{images_dir} /{file} .png" ,f"{yolo_images_dir} /test/{file} .png" ) print ("处理验证数据..." )for file in tqdm(val_files): cast_annotation_to_yolo_style_label(f"{annotations_dir} /{file} .xml" ,f"{yolo_labels_dir} /val/{file} .txt" ) copyfile(f"{images_dir} /{file} .png" ,f"{yolo_images_dir} /val/{file} .png" )
数据集的处理就完成了
创建配置文件,写入训练数据,验证数据,类别数量与对应名称。
1
2
3
4
5
6
7
dict_file = {'train' :f'{yolo_images_dir} /train' , 'val' : f'{yolo_images_dir} /val' , 'nc' : '3' , 'names' :['helmet' ,'head' ,'person' ]} with open ('./yolov5/data/hard_head.yaml' , 'w+' ) as file: documents = yaml.dump(dict_file, file)
1
2
cd yolov5python train.py --img 416 --batch 100 --epochs 60 --data data /hard_head.yaml --cfg models/yolov5m.yaml --weights yolov5m.pt --device 0 --workers 0
1
2
cd yolov7python train.py --device 0 --batch-size 30 --data .\data\hard_head.yaml --img 416 416 --cfg cfg/training/yolov7x.yaml --weights '.\yolov7x.pt' --name yolov7x --epoch 50 --hyp data /hyp.scratch.custom.yaml
更具自己的实际情况修改传入的参数,具体看readme 以及 yolo 的 help。